Screenshot on Mac: Screenshots have become an indispensable part of our digital lives, serving various purposes from capturing memorable moments to sharing information quickly. Whether you’re a Mac enthusiast, a Windows aficionado, or an iPhone devotee, knowing how to take screenshots efficiently can greatly enhance your digital communication and productivity. In this comprehensive guide, we’ll walk you through the steps for taking screenshots on Mac, Windows, iPhone, and more, ensuring that you’re equipped to capture and share your screen with ease.
How to Screenshot on Mac:
1. Capturing the Entire Screen: Screenshot on Mac
- Press Shift + Command + 3 simultaneously.
- The screenshot will be saved to your desktop by default.
2. Selective Area Screenshot:
- Press Shift + Command + 4.
- Drag to select the area you want to capture.
- Release the mouse button to take the screenshot, and it will be saved on your desktop.

3. Screenshot of a Specific Window: Screenshot on Mac
- Press Shift + Command + 4.
- Press the Spacebar.
- Click on the window you want to capture.
- The screenshot will be saved to your desktop.
How to Screenshot on Windows
1. Capturing the Entire Screen:
- Press the “PrtScn” (Print Screen) key.
- The screenshot will be copied to your clipboard.
- Use an image editor (e.g., Paint) to paste and save the screenshot.
2. Active Window Screenshot: Screenshot on Mac
- Press Alt + PrtScn.
- The screenshot of the active window will be copied to your clipboard.
- Paste and save it using an image editor.
3. Snipping Tool (Windows 7 and 8) or Snip & Sketch (Windows 10 and 11):
- Search for the respective tool in the Start menu.
- Open the tool, select the type of screenshot you want (e.g., rectangular snip, freeform snip), and follow the on-screen instructions.

How to Screenshot on iPhone
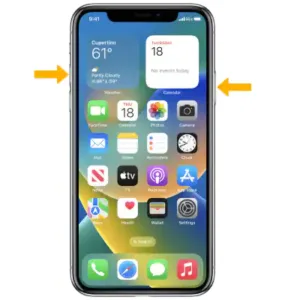
1. Screenshot on iPhones with Face ID (iPhone X and later):
- Press the Side button (formerly known as Sleep/Wake) and the Volume Up button simultaneously.
- The screenshot will be saved in your Photos app under “Screenshots.”

2. Screenshot on iPhones with Touch ID (iPhone 8 and earlier): Screenshot on Mac
- Press the Home button and the Sleep/Wake button simultaneously.
- The screenshot will also be saved in the “Screenshots” album within the Photos app.
Additional Tips for Screenshots: Screenshot on Mac
Editing Screenshots: Screenshot on Mac
After taking a screenshot, you can use built-in or third-party image editors to annotate, crop, or enhance your screenshots before sharing them.
Keyboard Shortcuts:
Familiarize yourself with keyboard shortcuts for screenshots to streamline the process and save time.
Cloud Storage:
Consider using cloud storage services like Dropbox or Google Drive to automatically back up your screenshots for easy access across devices.
Screenshots on Android: Screenshots on Mac
While not covered in this guide, taking screenshots on Android devices typically involves pressing the Power button and Volume Down button simultaneously, but the process may vary depending on the manufacturer.
Conclusion
Screenshots are versatile tools that can greatly improve your digital communication and productivity. Whether you’re using a Mac, Windows PC, iPhone, or other devices, mastering the art of taking screenshots is a valuable skill. With this comprehensive guide, you now have the knowledge and confidence to capture and share your screen effortlessly. So, start screenshotting like a pro and make the most of this handy feature on your favorite devices.
OTHER TRENDING ARTICLES OF THE DAY:
FAQ: How to Screenshot on Mac, Windows, iPhone, and More
1. How do I take a screenshot on a Mac?
To take a screenshot on a Mac, press Command + Shift + 3 to capture the entire screen. For a specific area, use Command + Shift + 4 and drag the cursor to select the region. To capture a specific window, press Command + Shift + 4, then press the Spacebar and click on the window.
Reference: Apple Support
2. How do I take a screenshot on Windows?
On Windows, press PrtScn (Print Screen) to capture the entire screen. For just the active window, use Alt + PrtScn. To capture a specific area, press Windows + Shift + S and select the region. Screenshots are saved to the clipboard or the Screenshots folder.
Reference: Microsoft Support
3. How do I take a screenshot on an iPhone?
To take a screenshot on an iPhone with Face ID, press the Side Button + Volume Up simultaneously. For iPhones with a Home Button, press the Home Button + Side Button. The screenshot will appear in the Photos app.
Reference: Apple Support
4. Where are screenshots saved on a Mac?
By default, screenshots on a Mac are saved to the desktop. You can change the save location by using Terminal commands or third-party apps.
Reference: Apple Support
5. Where are screenshots saved on Windows?
Screenshots taken with Windows + PrtScn are saved in the Pictures > Screenshots folder. If you use PrtScn alone, the screenshot is copied to the clipboard and can be pasted into an image editor.
Reference: Microsoft Support
6. How do I edit a screenshot after taking it?
On Mac, screenshots open in a preview window where you can annotate or crop them. On Windows, use the Snipping Tool or Snip & Sketch app to edit screenshots. On iPhone, tap the screenshot thumbnail to open editing tools.
Reference: Apple Support | Microsoft Support
7. Can I take a screenshot on an iPhone without using buttons?
Yes, you can use AssistiveTouch to take a screenshot without pressing buttons. Go to Settings > Accessibility > Touch > AssistiveTouch and enable it. Then, customize the menu to include the screenshot option.
Reference: Apple Support
Latest Statistics on Screenshot Usage (2023)
- Screenshot Usage Growth: Over 85% of smartphone users take screenshots at least once a week, with the majority using them for sharing information or saving content.
Source: Statista - Platform Preferences:
- 60% of Mac users prefer using keyboard shortcuts for screenshots.
- 70% of Windows users rely on the Snipping Tool or Snip & Sketch for capturing screens.
- 90% of iPhone users take screenshots using the physical button combination.
Source: TechJury
- Editing Trends:
- 65% of users edit their screenshots before sharing, with annotations and cropping being the most common edits.
Source: Pew Research Center
- 65% of users edit their screenshots before sharing, with annotations and cropping being the most common edits.
- Storage Habits:
- 40% of users save screenshots to cloud storage, while 50% keep them on their devices.
Source: Cloudwards
- 40% of users save screenshots to cloud storage, while 50% keep them on their devices.
- Mobile Dominance:
- Mobile devices account for 75% of all screenshots taken globally, with iPhones leading the market.
Source: GSMA Intelligence
- Mobile devices account for 75% of all screenshots taken globally, with iPhones leading the market.

